— tableofcontents: 1 redirect_from: “/Install-with-Docker” —
<!DOCTYPE markdown> # Install with Docker
Welcome to the AzerothCore Docker guide!
The example docker configurations for AzerothCore may seem non-idiomatic at times, and this document can help users get started with running an AzerothCore server in a container-based environment.
## Setup
### Software requirements
The only requirements are [git](https://git-scm.com/download/) and Docker.
- For GNU/Linux install [Docker](https://docs.docker.com/install/linux/docker-ce/ubuntu) - For macOS 10.12+ Sierra and newer version install [Docker Desktop for Mac](https://hub.docker.com/editions/community/docker-ce-desktop-mac) - For Windows 10 install [Docker Desktop for Windows](https://hub.docker.com/editions/community/docker-ce-desktop-windows)
You'll also need the `compose` plugin for docker. Installation instructions are available [at this link](https://docs.docker.com/compose/install/#scenario-one-install-docker-desktop). If you're using a machine with docker desktop, you do not need to do this step.
Before going further, make sure you have `docker` and `docker compose` installed in your system by typing in a terminal:
``` docker –version ``` ``` docker compose version ```
You should see a similar output:
``` Docker version 20.10.5, build 55c4c88 Docker Compose version 2.10.2 ```
Note for Windows users: you can use git-bash (the shell included in git) as a terminal.
### Clone the AzerothCore repository
You need to clone the AzerothCore repository (or use your own fork):
``` git clone https://github.com/azerothcore/azerothcore-wotlk.git –depth 1 ```
Now go into the main directory using `cd azerothcore-wotlk`. All commands will have to be run inside this folder.
### Installation
To build the containers, run `docker compose build`. And then to start the containers, run `docker compose up -d`
These commands can be bound into one, with `docker compose up -d –build`
The `ac-client-data` container will automatically download the client data to a volume, and the dbimport will execute database migrations. Both of these operations can take 10 to 15 minutes on the first run.
After the db-import is complete, the authserver and worldserver should start, and you can move on to [creating an account](#creating-an-account)
The containers can be taken down with `docker compose down`, or restarted with `docker compose restart`.
All of the commands noted in this section support taking a container name as an argument. For example, you can rebuild and restart the worldserver only with `docker compose up -d –build ac-worldserver`.
Further `docker compose` commands can be found [in their documentation](https://docs.docker.com/compose/reference/)
### (Alternative) Installation using Dashboard
Inside your terminal (if you use Windows, use git bash), run the following commands inside the azerothcore-wotlk folder
The following procedure uses our acore.sh dashboard, however, these commands are a thin wrapper around the standard `docker compose` CLI.
#### 1) Compile AzerothCore ``` ./acore.sh docker build ``` It will build docker images and compile the core automatically! This may take a while.
For Windows: if the build fails to complete with a message similar to the following: ``` unable to start container process: exec: “C:/Program Files/Git/usr/bin/bash”: stat C:/Program Files/Git/usr/bin/bash: no such file or directory: unknown ```
You may have an issue with Unix > Windows path conversion. Setting the `MSYS_NO_PATHCONV=1` environment variable may fix this:
``` MSYS_NO_PATHCONV=1 ./acore.sh docker build ```
#### 2) Run the containers
``` ./acore.sh docker start:app ```
Congratulations! Now you have an up and running azerothcore server! Continue to the next step to create an account
If you need to run this in background, you can use the following command to run the docker compose detached mode:
``` ./acore.sh docker start:app:d ```
### Creating an account
#### 1) Access the worldserver console
Open a new terminal and run the following command to attach to the worldserver:
``` docker attach ac-worldserver ```
To detach, press `ctrl+p` and `ctrl+q`. Do NOT try to detach using `ctrl+c` or you will kill your worldserver process!
If you got error message `the input device is not a TTY. If you are using mintty, try prefixing the command with 'winpty'`
This command will automatically attach your terminal to the worldserver console. Now you can run the `account create <user> <password>` command to create your first in-game account. There's [further information on the Creating Accounts page](creating-accounts.md).
### Access database and update realmlist
To access your MySQL database we recommend clients like [HeidiSQL](https://www.heidisql.com/) (for Windows/Linux+Wine) or [SequelPro](https://www.sequelpro.com/) (for macOS). Use `root` as user and `127.0.0.1` as default host. The default password of the root DB user will be `password`.
Unless your server installation is on the same machine as your client, you might want to update the `realmlist` address in the `acore_auth` database with your server's public or private IP address : ```sql USE acore_auth; SELECT * FROM realmlist; UPDATE realmlist SET address='$SERVER PUBLIC IP ADDRESS'; ```
## Procedures
### Taking backups
When running any kind of server that people depend on, it's important to take backups. For AzerothCore, taking backups is simple, as it's the same as taking a standard MySQL backup.
For each database (typically `acore_auth`, `acore_characters`, and `acore_world`), you should run this command:
```console $ mysqldump -h 127.0.0.1 -P3306 -u$DATABASE_USERNAME -p$PASSWORD DATABASE_NAME > ./DATABASE_NAME-$(date +%F).sql ```
Using the default settings for each database, the commands should look like this:
```console $ mysqldump -h127.0.0.1 -P3306 -uroot -ppassword acore_auth > acore_auth-$(date +%F).sql $ mysqldump -h127.0.0.1 -P3306 -uroot -ppassword acore_characters > acore_characters-$(date +%F).sql $ mysqldump -h127.0.0.1 -P3306 -uroot -ppassword acore_world > acore_world-$(date +%F).sql ``` <!– TODO Add equivalent command for powershell –>
A few notes about these commands:
- It's usually best to automate this command with a cron job (Linux/MacOS) or a scheduled event (in Windows). - The command `$(date +%F)` prints the date in “yyyy-mm-dd” format. This is useful so you can just run the command over and over again. - The defaults are designed to help someone get started as fast as possible. If you're running a system that people depend on, you should not use the root user (and the root user's password should be different) and instead there should be a user that's specifically used for backups. - For more information, we strongly recommend reading [MySQL's documentation on Backup and Recovery](https://dev.mysql.com/doc/refman/8.0/en/backup-and-recovery.html).
### Configuring AzerothCore in Containers
Similar to most applications running in containers, AzerothCore can be configured with environment variables. You can find the valid configuration parameters and their description from the default configuration files for [the worldserver](https://github.com/azerothcore/azerothcore-wotlk/blob/master/src/server/apps/worldserver/worldserver.conf.dist) and the [authserver](https://github.com/azerothcore/azerothcore-wotlk/blob/master/src/server/apps/authserver/authserver.conf.dist). Locally, these files can be found in the `env/dist/etc` directory after a build.
In Docker, the best way to set configurations for AzerothCore is to use an [`docker-compose.override.yml`](https://docs.docker.com/compose/multiple-compose-files/merge/) file. This creates an extra file that won't be overwritten by updating the git repo, though it still keeps all of your custom changes properly set up.
After you've found a parameter you'd like to change (perhaps `AllowTwoside.Interaction.Calendar`), you can create an override file like so:
```yaml <!DOCTYPE markdown> # docker-compose.override.yml services:
ac-worldserver:
  environment:
    AC_ALLOW_TWO_SIDE_INTERACTION_CALENDAR: "1" # AllowTwoSide.Interaction.Calendar
```
Figuring out the environment variable name of a configuration parameter can be a bit difficult. The general rules for this:
- The entire parameter is prefixed with `AC_` - Periods (`.`) become underscores (`_`) - A sequence with a lowercase letter and then an uppercase letter inserts an underscore (`_`) between them - The entire parameter is uppercased (so `foo` becomes `FOO`)
A few examples:
- `foo.bar_baz` ⇒ `AC_FOO_BAR_BAZ` - `MaxPrimaryTradeSkill` ⇒ `AC_MAX_PRIMARY_TRADE_SKILL` - `AllowTwoSide.Interaction.Calendar` ⇒ `AC_ALLOW_TWO_SIDE_INTERACTION_CALENDAR`
### How to keep your AzerothCore updated with the latest changes
First of all, you just need to use the `git` tool to update your repository by running the following command:
`git pull origin master` : this will download latest commits from the azerothcore repository
[Rebuild and restart](#installation) the containers as normal
### How to run the worldserver with gdb
Running the server with GDB allows you to generate a crashdump if the server crashes. The crashdump file is useful for developers to understand which lines are failing and possibly fix it.
In previous iterations of AzerothCore's docker containers, gdb was included by default. That has been changed in order to enforce smaller containers. For many issues if there's something where gdb is needed, it's quite often not a problem that's specific to Docker, and tools such as the [devcontainer](#devcontainer-support) can be used to further debug the issue.
Keep in mind that you should compile your code with either the Debug or RelWithDebInfo compilation types, otherwise gdb won't work properly.
To use gdb in the docker containers:
1. Edit the “runtime” target of the Dockerfile
1. To figure out which section is "runtime", it should be the ~15 or so lines under the "FROM skeleton as runtime" section
2. Find the “apt-get install” command in this runtime section 3. Edit the command so that it also installs GDB, and also copy in the `gdb.conf` file
1. It should look like this:
  ```
  RUN apt-get update && \
  apt-get install -y --no-install-recommends \
    libmysqlclient21 libreadline8 \
    gettext-base default-mysql-client \
    gdb gdbserver && \
  rm -rf /var/lib/apt/lists/*
  COPY apps/startup-scripts/gdb.conf /azerothcore/gdb.conf
  ```
4. Edit your `docker-compose.override.yml` so that the `command` for the `ac-worldserver` is `gdb -x /azerothcore/gdb.conf –batch /azerothcore/env/dist/bin/worldserver`
1. It should look like this:
  ```yaml
  services:
    ac-worldserver:
      command: gdb -x /azerothcore/gdb.conf --batch /azerothcore/env/dist/bin/worldserver
  ```
5. Restart and rebuild your containers, and the worldserver should now be running with gdb
If the server crashes, you will find the crashdump file (`gdb.txt`) within the `/azerothcore` folder. This can be copied out with the `docker cp ac-worldserver:/azerothcore/gdb.txt ./gdb.txt` command.v
### .devcontainer support
In `docker-compose.yml`, we define the `ac-dev-server` service This service is used for our build and db operations, but it can also be used by you to develop with the [VSCode Remote Docker extension](https://code.visualstudio.com/docs/remote/containers)
A dev-container lets you use a Docker container as a full-featured development environment. The .devcontainer folder in our project contains files to tell VS Code how to access (or create) a development container with all the needed tools. This container will run the AzerothCore with all the software and the configurations needed for working with our codebase and debugging the server.
Inside the azerothcore repo there's a pre-configured `devcontainer.json` that can be opened by using the VSCode command palette. To setup the Dev-Container follow these steps:
1. [Install and open VSCode](https://code.visualstudio.com/) 2. install the [remote-container](https://marketplace.visualstudio.com/items?itemName=ms-vscode-remote.remote-containers) extension 3. Open the azerothcore folder inside VSCode 4. Open the VSCode [command palette](https://code.visualstudio.com/docs/getstarted/userinterface#_command-palette) (Ctrl+Shift+P) and run: `>Remote-Containers: Reopen in Container`
IMPORTANT: The dev-container also contains a pre-configured debugger action that allows you to use breakpoints and debug your worldserver.
Do not forget that you need to [Remote Container extension](https://marketplace.visualstudio.com/items?itemName=ms-vscode-remote.remote-containers) installed in your [Visual Studio Code](https://code.visualstudio.com/) IDE
#### How to debug your code with the dev-container
NOTE: Keep in mind that you should compile your code with the Debug mode, otherwise the debugger won't work properly
Once inside the VSCode dev-container you can go to the debug session and use the `Linux/Docker debug` action as you can see in this image:
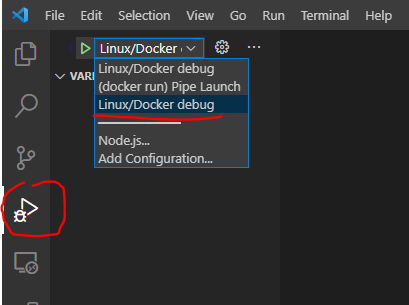
It will run a worldserver in debug mode and then you can start placing breakpoints in your code to debug it.
For more info about how to debug in vscode you can refer to the [official guide](https://code.visualstudio.com/docs/editor/debugging)
### How to create a second realm with docker compose
TODO
The gist of it is to edit the `docker-compose.yml` (or create an override) to add additional `ac-worldserver` and `ac-db-import` services. They can be copied from the main sections, but they should be renamed so there isn't a collision.
## FAQ
### How do I install modules?
Installing modules for docker is just the same as installing modules for the classic install: Clone the module to `./modules` and re-run the build. The difference is that the command for docker isn't the same as classic.
To add a module, place the module directory inside of the `/azerothcore-wotlk/modules` directory.
After adding a module you'll have to [rebuild the server](#installation) and restart the containers.
For example, to install `mod-solocraft`:
```console <!DOCTYPE markdown> # Clone the module to `modules` with the name of the repository $ git clone https://github.com/azerothcore/mod-solocraft.git modules/mod-solocraft <!DOCTYPE markdown> # Re-build Azerothcore $ docker compose up -d –build ```
Configurations through environment variables work with modules, though if you prefer configuration files you'll have to place them in the `azerothcore-wotlk/env/dist/etc/modules` directory. If this modules directory doesn't exist, you'll have to manually create it.
### Where are the logs for the server?
With docker, it's common that applications log to the console. With logging to the console, docker handles log rotation and persistence. You can view these with the `docker compose logs` command.
Additionally, they are located in `env/dist/logs`, though this may be removed in the future.
### How to deal with the permission issues
#### [Linux] You must run docker without sudo
It's important to run Docker without using sudo or the root user. To do that you must setup your current user to be part of the docker group.
This is noted within docker's documentation: [Post-installation steps for Linux](https://docs.docker.com/engine/install/linux-postinstall/)
### How can I delete my database files?
Warning Once you've deleted your database files they are unrecoverable unless you have a backup.
To remove your database files you firstly want to make sure that your containers have been stopped and removed by typing: `docker compose down`.
After stopping and removing your containers you can proceed to remove the volume by typing: `docker volume rm azerothcore-wotlk_ac-database`
Note If you've changed your folder name from the default `azerothcore-wotlk` the volume name will be slightly different. To find the new volume name you can use the command `docker volume ls`. The volume should be labelled something along the lines of `xxxx_ac-database`.
### Building the containers with the docker's default bridge disabled
If you have `{“bridge”:“none”}` in your docker daemon config file (at `/etc/docker/daemon.json`), there's 2 ways to properly build the containers.
This can sometimes be accompanied by this error message:
``` WARN[0000] buildx: failed to read current commit information with git rev-parse –is-inside-work-tree network mode “ac-network” not supported by buildkit - you can define a custom network for your builder using the network driver-opt in buildx create ```
To fix the builds for this, one may create a `docker-compose.override.yml` that sets the build network mode to `host`, allow the containers to build properly:
```yaml <!DOCTYPE markdown> # docker-compose.override.yml services:
ac-worldserver:
  build:
    network: host
ac-authserver:
  build:
    network: host
ac-db-import:
  build:
    network: host
ac-client-data-init:
  build:
    network: host
```
Keep in mind that this does not work on Windows or MacOS
A syntax where the `network` is set to the name of the network (so `ac-network` instead of `host` in the example above) should work properly, but unfortunately this seems to not be functioning or supported by docker, as evidenced in [Github Issue](https://github.com/docker/buildx/issues/175)
### Performance optimizations (for dev server)
NOTE: If you are not experimenting any particular issues with I/O performance, we suggest to NOT use this configuration
The osxfs and the NTFS are well known to have [performance limitations](https://github.com/docker/for-mac/issues/1592) with docker binded volumes, we optimized the docker compose by using volumes and the “delegated/cached” strategy when possible, but that's not enough for some configurations.
* Windows users: we suggest to use the [WSL2](https://docs.docker.com/desktop/windows/wsl/) to clone our repo and work with docker. It has similar performance to a native linux environment
* Mac users: unfortunately there is not something similar to WSL2 on Mac, however, only the `ac-dev-server` uses binded src volumes that can cause such slowness.
If you still want to use the `ac-dev-server` under Mac, consider to try the [acore-docker one](https://www.azerothcore.org/acore-docker/#dev-server). It uses named volumes
that are way faster than the binded ones.
### Docker reference & support requests
For server administrators, we recommend to read the [Docker documentation](https://docs.docker.com/) as well as the [Docker Compose reference](https://docs.docker.com/compose/reference/overview/).
If you want to be an administrator of an AzerothCore production server, it helps if you are familiar and comfortable with Docker and using a command line.
Feel free to ask questions on [StackOverflow](https://stackoverflow.com/) and link them in the #support-docker channel of our [Discord chat](https://stackoverflow.com/questions/tagged/azerothcore). We will be happy to help you!